Paneles de Investigación y Equipo
Lee el árbol de Investigación, inicia un Estudio y usa el panel de Equipo para contratar ingenieros, fijar políticas, gestionar el backlog y desplegar.
Press R to open Research and spend Insight on a Study. Press T to open Team and spend Dev Hours on Features. Both panels fill the board, and Esc closes them.
The Research panel#
The Research button is in the toolbar at the top right. It shows up the first time your Insight can pay for an item, and a badge counts the items you can afford. Before that, R does nothing.
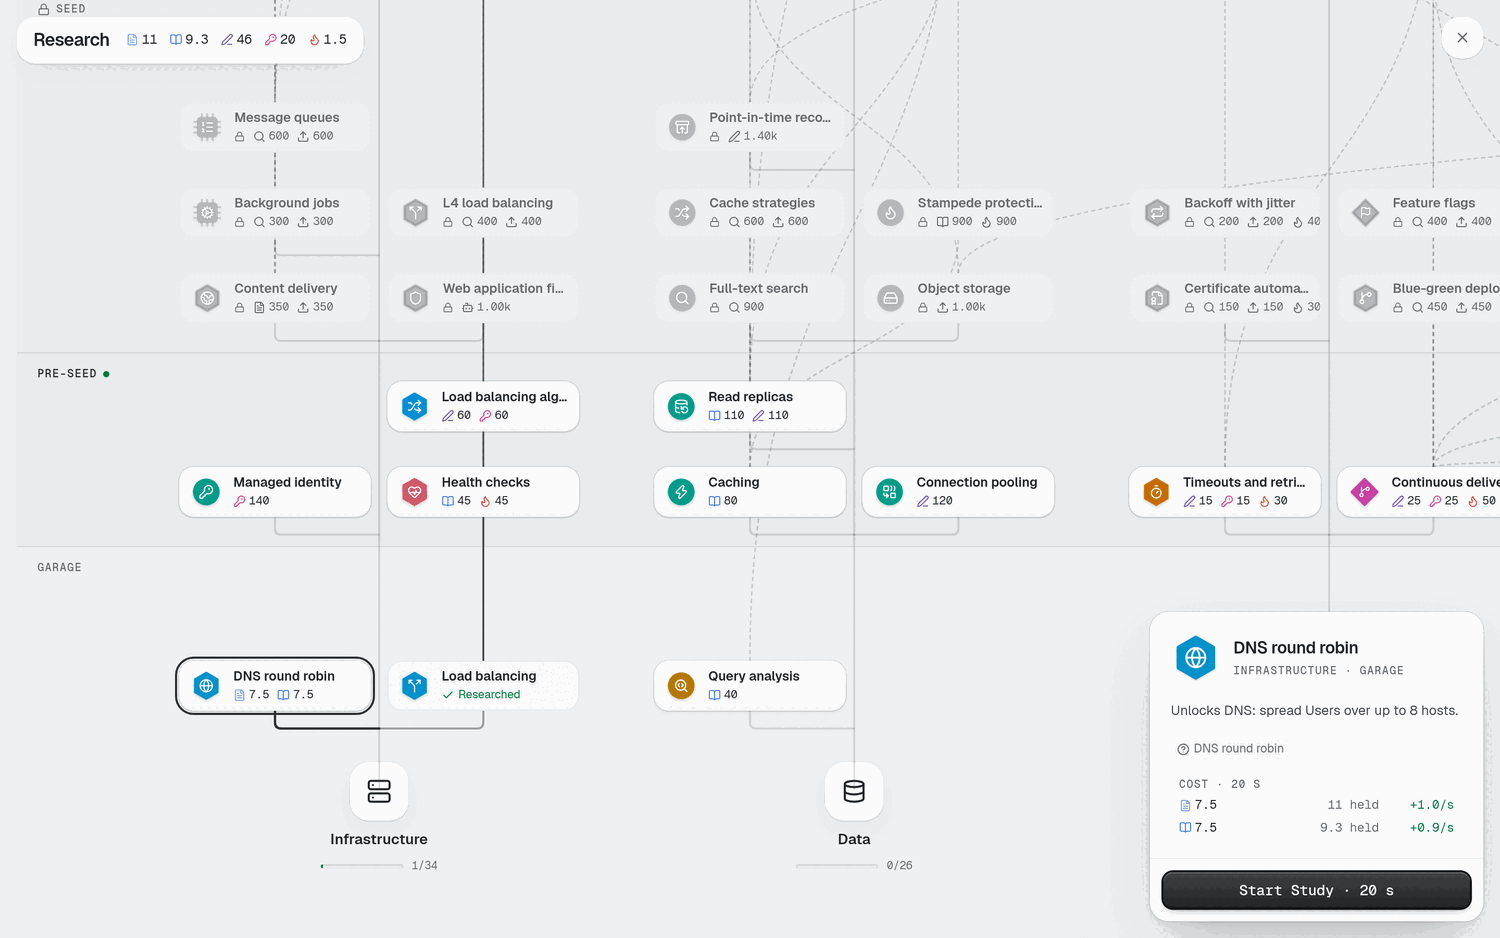
Look at the header chips. Each chip is one Insight pool and the amount you hold. Then look at the tree: each track grows up from its root, with one band per Era. The tracks are Infrastructure, Data, Reliability, Observability, Performance, Runtimes, Frameworks, Security, Product, and Cost.
Read an item#
Click an item to focus it. The detail sidebar on the right shows:
Cost: one row per pool in the item's recipe. Each row shows the cost, how much you held, and the rate the pool earns per second. A held amount in amber means you cannot pay yet. A kind with a Product lever also shows that lever on its row: the step, the share of traffic the kind takes, and a Build button.
Requires: the items you must own first. Click one to jump to it.
Leads to: what the item opens.
The sidebar's main button says what you can do now:
| Button | Meaning |
|---|---|
| Start Study | You can start it. The button also shows how long it takes. |
| Studying · n% | It runs now. |
| Study now | It waits in the queue. Select it to move it to the front, with any prerequisite it waits on. |
| Opens in Era | The Era has not started yet. |
| Study after items | A prerequisite is missing. Select it to queue the missing prerequisites first, then the item. The button names them. |
| Researched | You own it. |
A locked item is not an error. It tells you what to do next: wait for the Era, or queue it and let its prerequisites run first. When a long chain is missing, the button counts the prerequisites instead of naming them. A warning in the sidebar says what a Study is waiting for: a pool that earns nothing, or a shape the Design does not show yet, such as a Cache that never hits or a Database that spends too little of its work on reads. The sidebar shows how far the Design is from the requirement, such as 47% of 60%, and Queue Study puts the item in the queue to start when the requirement is met. For a chain, it names the first Study that waits. A pool stops filling at its cap, so Insight you hoard past that point earns nothing more. Read Earn Insight and research for where Insight comes from.
Start and queue a Study#
Press
R.Click an item whose button reads Start Study.
Select Start Study. The Insight card on the HUD shows the Study's name and its percentage.
Press
Escto go back to the board. The Study keeps running.
To queue more, pick another item and select its button, or double-click it in the tree. The queue holds eight Studies, a chain counts every Study in it, and an unaffordable Study at the front holds every Study behind it, which the sidebar tells you. Each queue row has Move up, Move down and Cancel buttons, and you can drag a row to a new place. Cancel loses its progress.
A Study never moves above a prerequisite it needs. Its Move up button turns off, and a drag that would pass the prerequisite is refused with a toast that names it. Cancelling a prerequisite also cancels the queued Studies that need it.
Raise a pool's supply#
A pool that cannot keep up with a Study slows it down, and the fix can be a product change rather than more samples. Open the item that runs, and every kind with a Product lever shows one under its Cost row.
Read the card under the pool row. When the pool limits the Study, the title says the kind's Insight is too low, and the line below it gives both rates: what the pool earns a second and what the Study needs. The last line names what the next step reaches in share of traffic and what it costs in user growth.
Select Build. The step joins the Team backlog with the Dev Hours of that step, and a Team spends them on it.
Watch the Team panel until the item reaches Shipping. When the deploy lands, the kind's share rises, its pool earns faster, and the card offers the next step. A step the Era has not opened stays greyed, and the card says which Era opens it.
To take a step back, select Remove. It removes the last step and returns half its Dev Hours, and the share goes back to the other kinds.
A step already on the backlog, a Venture's cap, and a locked mix each leave the button greyed with the reason under it. A Challenge pins its mix, so it shows no lever card at all.
The Team panel#
The Team button appears after your first Feature ships. An amber dot on it means the backlog is empty. For the rules behind the numbers, read Team and velocity.
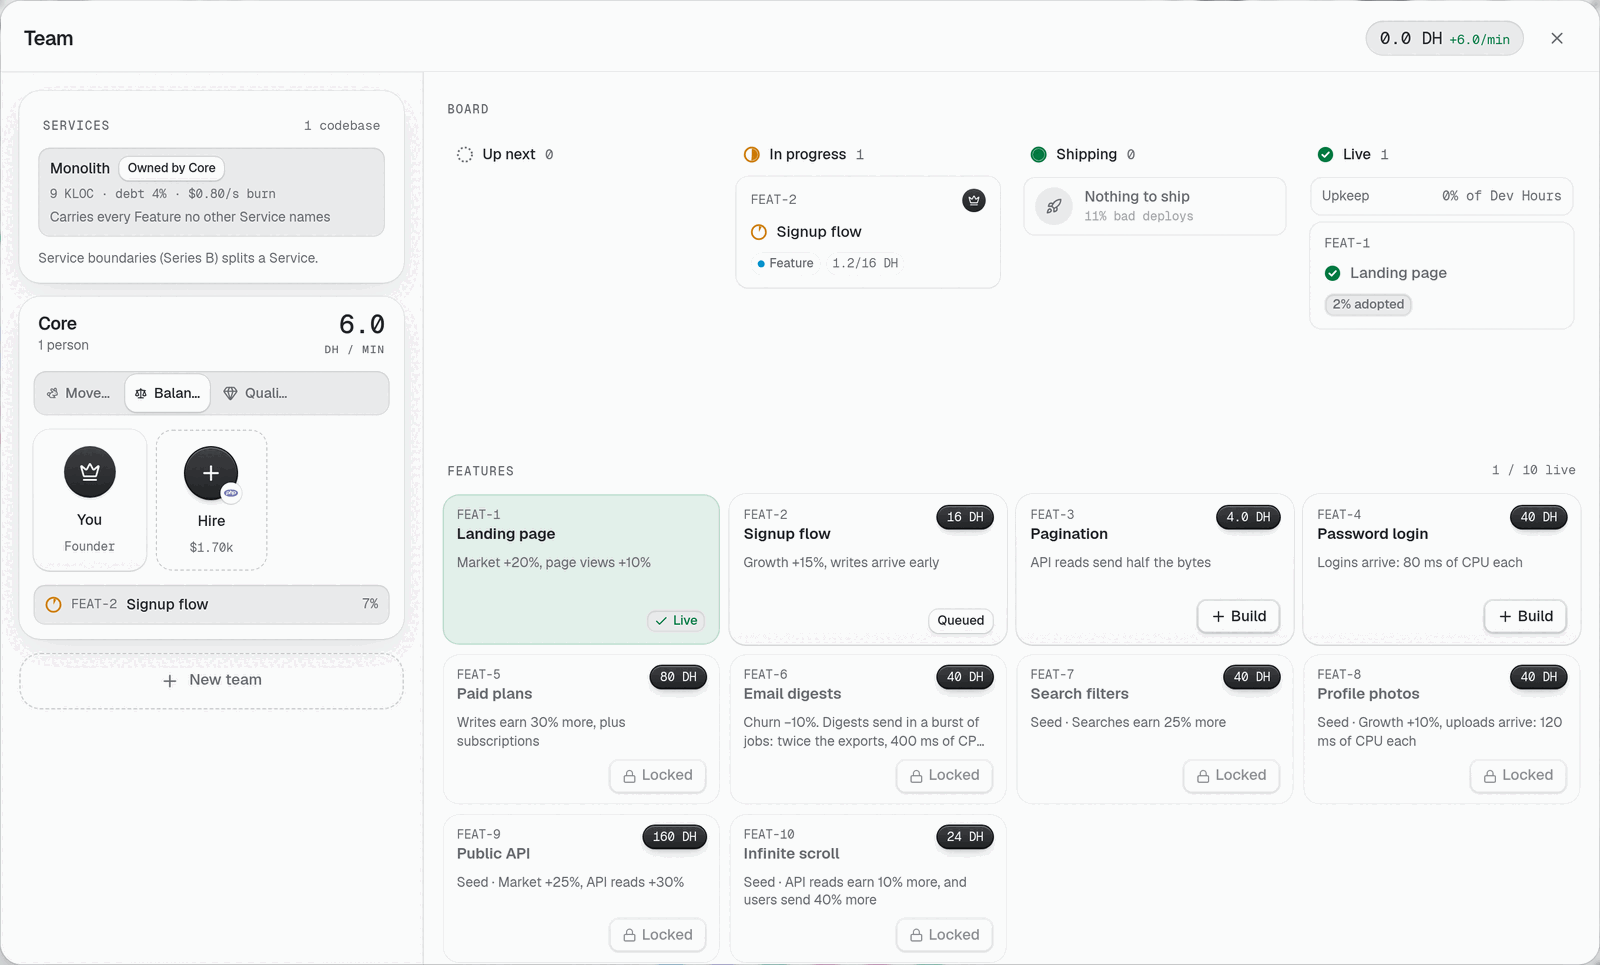
The header shows your Dev Hours balance, its rate per minute, and the payroll per second. The panel has two halves.
The floor (left)#
The floor shows one card per Team. Each card lists its engineers, starting with Founder (labelled "You"). Each engineer shows a salary per second, or Ramping while they are new.
Select Hire on an empty seat. The seat's label names the language, for example "Hire Python engineer for $x". It reads Locked until Pre-seed, and it is greyed when you cannot pay the signing cost.
To move an engineer, drag them to another Team, or use the move button on their card.
To teach an engineer the language your Service runs, or the one a migration is moving to, hover their card and use its Learn button. The button shows the language and the price. The engineer works at half speed until their ring fills, then takes the language. The button is greyed when you cannot pay.
To lay someone off, hover their card and use its Lay off button.
Select New team to add a Team. A Team has a kind: Product, Platform, SRE, Data or Security.
A Product team has three policies: Move fast, Balanced and Quality. They trade speed against debt and bad deploys. The other kinds run the system and do not build Features: SRE holds the pager, Data runs the warehouse, Platform runs Clusters and deploys, and Security runs WAF rules, dependency scanning, and compliance. Hiring early to go faster backfires, because more engineers cost payroll every second and coordination slows a large Team, so read Team and velocity before you hire a Team you do not need.
A team of eight engineers stops starting work. Every item it starts waits for your approval, and the Team board says Waiting on you: team too big. Approve the item, or move engineers to another team. On Core the founder is an extra person, so Core waits at nine people.
The Board (right)#
The Board has four columns: Up next, In progress, Shipping and Live.
Find a tile under Features. Select Build to add it to the backlog.
Watch it move to In progress. Teams spend Dev Hours on it.
A finished item waits in Shipping. The deploy card says Deploy in and a time, then the Feature goes Live.
Use the lightning button on a backlog item to Rush it with Dev Hours. Rushed work finishes now and adds tech debt to its Service. From Pre-seed, a rushed Feature makes its deploy likelier to ship a bug. Use Cancel to drop it.
Under Engineering, select Queue on a tile to pay down tech debt or fix a leak. The row appears when something needs fixing.
The deploy card also shows a % bad deploys line. A high figure means a deploy may break the App Servers. The bad deploy banner on the next page shows how to roll one back.
Autopilot#
The Autopilot switch in the Board header turns on the backlog's automatic mode. It shows once the backlog holds two items. Three more switches appear only when your Autopilot perk has the level for them:
Queue the cheapest Study
Hire while payroll is under a quarter of revenue
Buy the next size for App Servers above 70% load
Because the perk is a Legacy purchase, a new Company shows none of them.